- Author Antonio Harrison harrison@cultureoeuvre.com.
- Public 2023-12-16 07:44.
- Last modified 2025-01-22 21:44.
A database dump is the unloading of all the information it contains for the purpose of creating a backup copy or transferring it to another storage location. Typically, this creates text files containing instructions to recreate the structure of tables and fill them with content. For MySQL databases, the most convenient way to create a dump is to use the phpMyAdmin application.

It is necessary
PhpMyAdmin application access
Instructions
Step 1
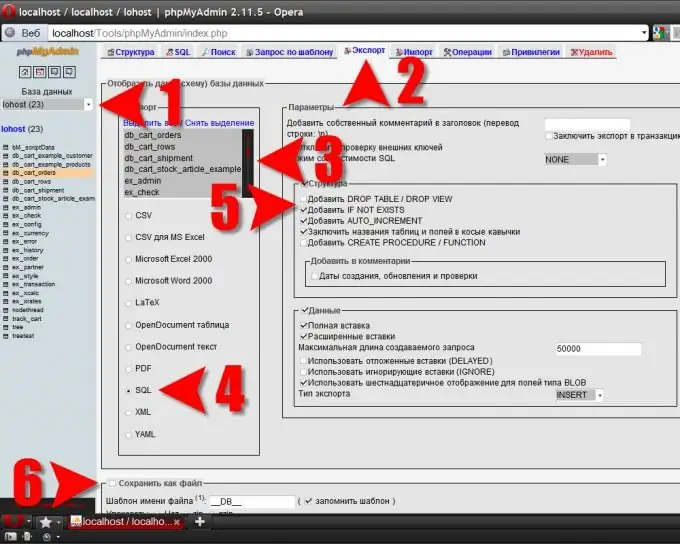
After launching the application, log in and select the database whose data you want to download in the left frame.
Step 2
After going to the page of the required database, click the "Export" link in the right frame.
Step 3
The export settings page will load, where the first thing you need to do is click the "Select All" link above the list of tables.
Step 4
Then select the format of the future dump. If you do not intend to load the database into any office application, then leave the default value (SQL).
Step 5
If a dump is created in order to add data from this database to another containing the same table structure, then you need to make sure that there is no checkmark opposite the inscription "Add DROP TABLE". Otherwise, the existing tables along with the data they contain will be destroyed during the process of adding data from the dump.
Step 6
If you do not check the box next to "Save as file", then the dump will be uploaded to the text field on the browser page. You will need to create an empty document in any text editor, then copy the entire contents of the text field, transfer it to the created document and save it with the sql extension. Therefore, if you want to get a ready-made dump file, then check the necessary box.
Step 7
To start the dump upload process, click the OK button at the very bottom of the phpMyAdmin right frame. The time it takes for the SQL Server to prepare the dump depends on the amount of data stored. Sometimes it takes several tens of minutes.

